DIY 8 Point Deer Painting
This week I decided to get a little creative/different and make a painting of an 8-point deer. I wanted this painting to look a little rustic and vintage so I used some old beat up boards and varnish. This painting could look great over top of a fireplace, in your bedroom, or even in a “man cave”.
Things you’re going to need to create this painting:
- 7 or more beat up boards
- Measuring Tape
- Pencil
- Saw
- Hammer
- Nails
- Sander
- Chestnut Stain
- Varnish
- Tracing Paper
- Pattern Paper
- White acrylic Paint
- Paintbrush
- Hanging screws/nails
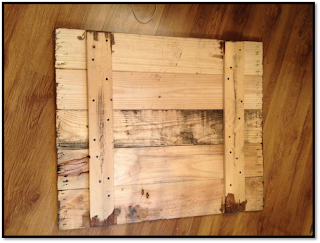
Step 1: First find 7 or more boards and use a measuring tape to measure 5 of the boards at the same length. Measure the other 2 boards at the same length, but at a longer length then the other boards. Once the 5 boards are cut, line them up and face the good side of each board on the ground. Grab the two longer boards and place them onto the 5 lined up boards. Place the 2 boards on each side of the 5 lined up boards and now take nails and nail the 2 boards into the 5 boards. The 2 boards hold the 5 boards together.
Make sure your boards end up looking like this on the back.
Step 2: Once all the boards are nailed together take out your hand sander and sand the surface and sides of the boards. Keep sanding until the surface and the sides of the boards are smooth.
Step 3: Once every area is sanded take your chestnut or any color stain and use your paintbrush to stain the attached boards. You’ll need one coat.
Step 4: Once the stain is completely dried I looked at a similar photo of a deer that I liked and then decided to draw it on the pattern paper. This took awhile to draw but I got it looking just the way I wanted my deer to look. Make sure the deer will fill up majority of the space on the boards.
Step 5: Tape the deer drawing that’s drawn on the pattern paper and place it where you would like it to be painted on the boards. Use your tracing paper to put underneath the pattern paper and use your pencil to trace the deer picture onto the boards. The tracing paper allows for the image to transfer from the pattern paper onto the boards.
Step 6: Once the deer is traced onto the boards take your white acrylic paint and paintbrush and do 3-4 coats of the deer. Use a smaller brush to paint the antlers. Once the white paint is completely dried use your paintbrush and do one coat of varnish to make the painting look a little more rustic and shiny. After the varnish is dried you can screw or nail hanging nails into the back of the boards and hang the deer painting anywhere you’d like.
Hope you enjoyed, thanks guys!


No comments:
Post a Comment