Showing posts with label DIY. Show all posts

Tuesday, 29 January 2013

DIY Valentines Day Banner


Easy Valentines Day Banner

I decided to decorate my condo for Valentines Day. I didn’t want it to look too cheesy, so I just made a simple heart banner. I cut out so many hearts that I was able to place heart banners in a few places. The banner looks pretty strung across the fireplace mantel, bed headboard, windows or walkways.

The items you will need to create this cute heart banner are:
  • Red and pink construction paper
  • Brown twinge (string)
  • Red Sparkles
  • Scissors
  • Glue
These items can be purchased at Michael’s or any craft store.

Step 1: Cut out as many red and pink hearts out of the construction paper. You can than use the glue and sparkles and decorate the hearts as you wish. I put sparkles on every other red heart, and around the edges.

Step 2: Once all your hearts are cut out and glittered, use the scissors and string to poke holes through each heart. Then string the twinge through each hole and your valentine’s heart banner will be completed. You can now place it anywhere you’d like.

Hope this was an easy and fun Valentines Day project! 


Saturday, 24 November 2012

DIY Pine Trees in Crown Jars


DIY Pine Trees in Crown Jars

Hello everyone on this very snowy, Saturday, morning!
Today, I was totally inspired by our recent snowfall that I decided to get crafty and make a snowy, Christmassy, craft! Today’s craft was easy to create and looks so pretty. These DIY Pine Trees in Crown Jars look great on the windowsill, fire mantel, or used as holiday centerpieces.

Items you’ll need to build this craft:
  • Vintage Crown Canning Jars/Mason Jars
  • Epsom Salt
  • Small Village Décor Trees

Step 1: Find a Crown jar, Crown jars can be purchased at flea markets or garage sales. I found mine in my grandma’s basement. I like using the Crown jars for this craft because I like the blue tint that the jar has, it gives the craft a snowy look. However, Mason jars will also work. I then used bleach and hot water and washed each jar out.

Step 2: After each jar was clean and dried, I add in the Epsom salt. Put about 2 scoops of salt into each jar, making sure that the bottom of the jar is covered. Then place your mini trees into each jar. These mini pine trees can be purchased at the dollar store or Canadian Tire. Now Sprinkle a few more scoops of salt into the jar to make the trees look like they’re covered in snow. The salt also packs down each trees base so that the trees don’t move. Once your jars are looking nice and snowy its time to put the lid, on and place the jars wherever you’d like!

Hope you guys enjoyed the DIY Pine Trees in Crown Jars craft!
More Christmas crafts to come! 


Monday, 19 November 2012

DIY Holiday Peppermint Candy Candle


DIY Holiday Peppermint Candy Candle

This weekend I started to watch some Christmas movies, pin some Christmas ideas, and started to dig out some of the Christmas decorations. After going Christmas crazy I decided to make a really easy Christmas craft, Christmas candles! These Christmas candles can be placed on fire mantels or used as festive centerpieces for Christmas dinner.
These Christmas candles are very easy to make and a lot cheaper then purchasing them from the store.

Items you’ll need to create these Christmas Candles:
  • Plain white candles, any size.
  • Hot glue guy and glue sticks
  • Peppermint Christmas Candy 
  • Spray Varnish 

Step 1: Go to Wal-Mart or a dollar store and purchase a white candle. Then go to the Bulk barn and purchase some peppermint Christmas candy.

Step 2: Once you have purchased your candle and the candies its time to plug in the glue gun and start gluing the candies onto the candle. Make sure to do one row of candies at a time, starting at the bottom so that you will know how many candies will fit evenly onto the candle. Be careful, this can become very sticky!

Step 3: Once the candies are glued onto the candle you can take spray varnish or any type of clear spray that seals, and spray the candies. Try not to spray the entire candle. The spray helps the candies stay onto the candle longer, gives the candle a shiny finish and decreases the stickiness.

Step 4: Once the spray has dried your candle is ready to burn and look festive! Hope you guys enjoyed this easy Christmas craft! More to come.


Saturday, 17 November 2012

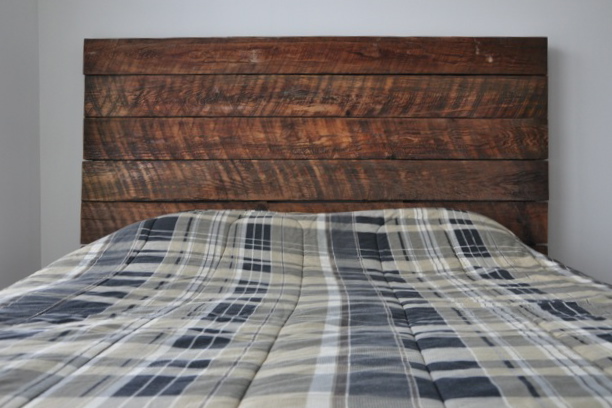
DIY Barn Board Headboard


DIY Barn Board Headboard

Over the past few weeks I have been putting together a headboard for my double size bed. I came across this idea through Pinterest. I was looking into purchasing a new headboard but they were too expensive, so I did some researching and came across a DIY headboard. I choose to create a rustic look using old barn boards that I found at my granddads farm.

This project is really inexpensive and easy to do!

Items you’ll need to create a DIY barn board headboard:
  • 9 Barn boards
  • Saw
  • Screw Gun
  • Screws
  • Wire brush
  • Electric Sander
  • Chestnut Stain
  • Varnish
  • Paintbrush

Step 1: Once you have 9 barn boards, set 2 aside. Use the other 7 boards and measure them to be about 1 foot longer then your bed. Once the boards are measured at the same length cut them. Use the other two boards and place them vertical on the back of the 7 boards. Use a screw gun and screw each board into the two vertical boards.

Step 2: Once the boards are all screwed together you can now see the outline of what your headboard is going to look like. My barn boards were dirty so I used a wire brush, kind of like a bbq brush and brushed all the dirt off.

Step 3: Once all the dirt is completely off the headboard you can now start painting. Grab your paintbrush and chestnut stain and do 2 to 3 coats of stain each time a layer has dried.

Step 4: Once all the stain is dried, do 1 coat of varnish. You can also do 1 coat of varnish on the back of your headboard too.

EXTRA: There are multiple ways to hang the headboard against the wall. You can screw 2 large hooks in the back of the headboard and mount the headboard on the wall or you can add legs to the headboard.

Hope you guys love this project just as much as I did!


Wednesday, 7 November 2012

DIY Wood Candleholder Centre Piece


DIY Wood Candleholder Centerpiece

 
Hello all!

This week I decided to create another DIY candleholder. I was browsing on Pinterest and I came across a candleholder made out of a thick piece of wood. I then went to my grandparents in search of a similar piece. After hunting for a few minutes I was able to find the perfect piece of wood. Next, I got down to work in hopes of creating a DIY wood candleholder centerpiece! 

The supplies you’ll need to create this cute candleholder are the following:
  • Thick piece of wood
  • Drill press with a round bit
  • Sander
  • Paint Brush
  • Chestnut Stain
  • Varnish

(Majority of these supplies can be purchases at a home hardware store.)

Step 1: Once you’ve found a thick or long piece of wood, take a drill press with a round bit and drill 10 or more holes depending on the size of your piece of wood. Drill the wholes in a pattern onto the wood. The round bit is the same size as a tea light, so the candles will fit perfectly into the drilled wholes.

Step 2: Once all the holes are drilled, I used a palm sander and sanded the piece of wood down until it felt soft.

Step 3: After the wood was sanded down I used my paintbrush and chestnut stain and painted on 3 coats of stain. I wanted my candleholder to look very shiny. Once the stain was dry I took another paintbrush and painted on 1 coat of varnish. The varnish is a final coat that leaves the piece looking sealed and shiny. Once the varnish is completely dry you can now place the candleholder anywhere you’d like. I placed mine on top of my table and used it as a centerpiece. I also place it on top of the fireplace mantel.

EXTRA: I eventually carved my boyfriend’s, and my initials into the piece of wood. I did this with a stencil and a electric wood carver. This is very easy to do and adds more to the piece.

Hope you guys enjoyed the DIY wood candleholder centerpiece tutorial!   

Wednesday, 31 October 2012

DIY 8 Point Deer Painting


DIY 8 Point Deer Painting

This week I decided to get a little creative/different and make a painting of an 8-point deer. I wanted this painting to look a little rustic and vintage so I used some old beat up boards and varnish. This painting could look great over top of a fireplace, in your bedroom, or even in a “man cave”.

Things you’re going to need to create this painting:
  • 7 or more beat up boards
  • Measuring Tape
  • Pencil
  • Saw
  • Hammer
  • Nails
  • Sander
  • Chestnut Stain
  • Varnish
  • Tracing Paper
  • Pattern Paper
  • White acrylic Paint 
  • Paintbrush
  • Hanging screws/nails
(All of these tools can be purchased at any hardware of craft store.)

Step 1: First find 7 or more boards and use a measuring tape to measure 5 of the boards at the same length. Measure the other 2 boards at the same length, but at a longer length then the other boards. Once the 5 boards are cut, line them up and face the good side of each board on the ground. Grab the two longer boards and place them onto the 5 lined up boards. Place the 2 boards on each side of the 5 lined up boards and now take nails and nail the 2 boards into the 5 boards. The 2 boards hold the 5 boards together.
Make sure your boards end up looking like this on the back.

Step 2: Once all the boards are nailed together take out your hand sander and sand the surface and sides of the boards. Keep sanding until the surface and the sides of the boards are smooth.

Step 3: Once every area is sanded take your chestnut or any color stain and use your paintbrush to stain the attached boards. You’ll need one coat.

Step 4: Once the stain is completely dried I looked at a similar photo of a deer that I liked and then decided to draw it on the pattern paper. This took awhile to draw but I got it looking just the way I wanted my deer to look. Make sure the deer will fill up majority of the space on the boards.

Step 5: Tape the deer drawing that’s drawn on the pattern paper and place it where you would like it to be painted on the boards. Use your tracing paper to put underneath the pattern paper and use your pencil to trace the deer picture onto the boards. The tracing paper allows for the image to transfer from the pattern paper onto the boards.

Step 6: Once the deer is traced onto the boards take your white acrylic paint and paintbrush and do 3-4 coats of the deer. Use a smaller brush to paint the antlers. Once the white paint is completely dried use your paintbrush and do one coat of varnish to make the painting look a little more rustic and shiny. After the varnish is dried you can screw or nail hanging nails into the back of the boards and hang the deer painting anywhere you’d like.

Hope you enjoyed, thanks guys!