Showing posts with label Green. Show all posts

Monday, 19 November 2012

DIY Holiday Peppermint Candy Candle


DIY Holiday Peppermint Candy Candle

This weekend I started to watch some Christmas movies, pin some Christmas ideas, and started to dig out some of the Christmas decorations. After going Christmas crazy I decided to make a really easy Christmas craft, Christmas candles! These Christmas candles can be placed on fire mantels or used as festive centerpieces for Christmas dinner.
These Christmas candles are very easy to make and a lot cheaper then purchasing them from the store.

Items you’ll need to create these Christmas Candles:
  • Plain white candles, any size.
  • Hot glue guy and glue sticks
  • Peppermint Christmas Candy 
  • Spray Varnish 

Step 1: Go to Wal-Mart or a dollar store and purchase a white candle. Then go to the Bulk barn and purchase some peppermint Christmas candy.

Step 2: Once you have purchased your candle and the candies its time to plug in the glue gun and start gluing the candies onto the candle. Make sure to do one row of candies at a time, starting at the bottom so that you will know how many candies will fit evenly onto the candle. Be careful, this can become very sticky!

Step 3: Once the candies are glued onto the candle you can take spray varnish or any type of clear spray that seals, and spray the candies. Try not to spray the entire candle. The spray helps the candies stay onto the candle longer, gives the candle a shiny finish and decreases the stickiness.

Step 4: Once the spray has dried your candle is ready to burn and look festive! Hope you guys enjoyed this easy Christmas craft! More to come.


Friday, 19 October 2012

DIY Crow Silhouette Painting


DIY Crow Silhouette Painting

This week I wanted to make something spooky or festive for Halloween, but I also wanted to be able to use this piece all year long. So, I was looking on Pinterest and I seen a crow silhouette painting that I just had to have, so I decided to make it!

What you will need to make the crow silhouette painting is:
  • Thin piece of wood
  • Tracing paper
  • Pattern paper
  •  Pencil
  •  Sander
  •  Black/dark aqua blue/brown acrylic paints
  • Thin and thick paint brush
  •  Varnish

(All of these tools can be purchased at any craft or hardware store.)

Step 1: Once you have found a thin piece of wood use the sander to sand it down to make sure it’s completely smooth. Next use the thick paintbrush and paint the entire piece of wood dark aqua blue.

Step 2: Once the paint is dry dip your thick paintbrush into the brown acrylic paint. Dab the brown paint on the edges and corners of the piece of wood to give it a dark old look. Over coat the brown dabs with black paint and keep blending the colors together for an even spookier look.

Step 3: Now choose a set of crows that you’ve seen on the Internet or draw a set of you’re own. I found a set of crows online and then enlarged the photo as big as I wanted it to be. Then I used pattern paper and traced the crows from the computer screen onto the pattern paper. Once this step is complete you can now use your tracing paper and place it onto the piece of wood with the crow pattern on top. Use a pencil and trace the pattern onto the piece of wood. The tracing paper allow for the pattern to be clear and traced onto the piece of wood.

Step 4: Once the crow outline is on the piece of wood use a small paintbrush and paint the crows in with the black paint. Once the crows are painted and totally dry use your large paintbrush to put a coat of varnish onto the painting. This allows the painting to look shiny and bright! Once the varnish is dried you are all done your crow silhouette painting.

Any questions let me know guys!
Enjoy J

Saturday, 6 October 2012

DIY P.S I Love You Mailbox


P.S I love you Mailbox

Sweet DIY mail boxes are a great idea to try for something different then the boring name and adress on every regular mailbox. The mailbox I created was simple to do and fun! I loved the way it turned out!

I thought this mailbox would be perfect for wedding cards, a decoration, or used as a mailbox.


DIY Mailbox Turtorial

Step 1: First you will have to puchase a plain mailbox from any hardware store or even garage sale. Mailboxes are usually around $20-30 dollars.

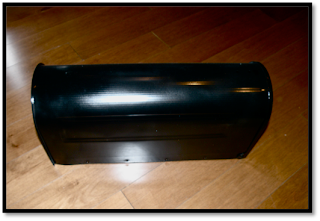
Step 2: The second step would be to paint your mailbox black. I did this with black spray paint because it drys fastern and doesn’t leave any brush storkes. You will also have to spray paint the screws, bolts, handles, and the piece that holds the flag up.


This is what it should look like after is has been spray painted.


Step 3: Now its time to put the quote onto the mailbox, this is done very easily. You will need tracing paper that is available at any craft stores. You will also need to print the quote onto a banner size using Microsoft word. The font size should be around 300, and you can choose any font style you prefer. Now you need to place the quote in banner size on the mailbox and tape it there so that it doesn’t move. Then slide a piece of tracing paper underneath the quote. Now with a pencil trace the quote onto the mailbox. The tracing paper allows the quote to be transferred onto the mailbox.


This is what the quote should look like after its been trasfered onto the mailbox.

Step 4: Now that the quote is traced onto the mailbox you can start painting! You can choose any type of paint colors you would like but make sure its perm enamle paint. The colors I chose were grass green, sunny yellow, parry purple, and hot pink. Also use very fine, squared, paint brushes, they will help you with the edging. They can be purchased at any craft store.

Step 5: Now just take your time and paint in between the lines, just like coloring. Do two to three coats, until the quote looks bold.

Step 6: After painting the quote onto the mailbox, spray the mailbox with a clear coat of varnish. This pervents the paint from chipping and rusting, it also makes the mailbox look shiny! 


Step 7: Just for extra I painted the mailbox flag yellow, I did this with spray paint, and I also added initals to the lid. I hope you have as much as fun as I did painting this pretty mailbox!