Showing posts with label Varnish. Show all posts

Saturday, 17 November 2012

DIY Barn Board Headboard


DIY Barn Board Headboard

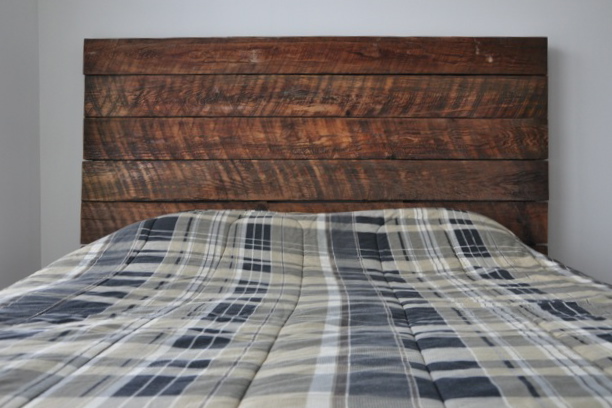
Over the past few weeks I have been putting together a headboard for my double size bed. I came across this idea through Pinterest. I was looking into purchasing a new headboard but they were too expensive, so I did some researching and came across a DIY headboard. I choose to create a rustic look using old barn boards that I found at my granddads farm.

This project is really inexpensive and easy to do!

Items you’ll need to create a DIY barn board headboard:
  • 9 Barn boards
  • Saw
  • Screw Gun
  • Screws
  • Wire brush
  • Electric Sander
  • Chestnut Stain
  • Varnish
  • Paintbrush

Step 1: Once you have 9 barn boards, set 2 aside. Use the other 7 boards and measure them to be about 1 foot longer then your bed. Once the boards are measured at the same length cut them. Use the other two boards and place them vertical on the back of the 7 boards. Use a screw gun and screw each board into the two vertical boards.

Step 2: Once the boards are all screwed together you can now see the outline of what your headboard is going to look like. My barn boards were dirty so I used a wire brush, kind of like a bbq brush and brushed all the dirt off.

Step 3: Once all the dirt is completely off the headboard you can now start painting. Grab your paintbrush and chestnut stain and do 2 to 3 coats of stain each time a layer has dried.

Step 4: Once all the stain is dried, do 1 coat of varnish. You can also do 1 coat of varnish on the back of your headboard too.

EXTRA: There are multiple ways to hang the headboard against the wall. You can screw 2 large hooks in the back of the headboard and mount the headboard on the wall or you can add legs to the headboard.

Hope you guys love this project just as much as I did!


Wednesday, 7 November 2012

DIY Wood Candleholder Centre Piece


DIY Wood Candleholder Centerpiece

 
Hello all!

This week I decided to create another DIY candleholder. I was browsing on Pinterest and I came across a candleholder made out of a thick piece of wood. I then went to my grandparents in search of a similar piece. After hunting for a few minutes I was able to find the perfect piece of wood. Next, I got down to work in hopes of creating a DIY wood candleholder centerpiece! 

The supplies you’ll need to create this cute candleholder are the following:
  • Thick piece of wood
  • Drill press with a round bit
  • Sander
  • Paint Brush
  • Chestnut Stain
  • Varnish

(Majority of these supplies can be purchases at a home hardware store.)

Step 1: Once you’ve found a thick or long piece of wood, take a drill press with a round bit and drill 10 or more holes depending on the size of your piece of wood. Drill the wholes in a pattern onto the wood. The round bit is the same size as a tea light, so the candles will fit perfectly into the drilled wholes.

Step 2: Once all the holes are drilled, I used a palm sander and sanded the piece of wood down until it felt soft.

Step 3: After the wood was sanded down I used my paintbrush and chestnut stain and painted on 3 coats of stain. I wanted my candleholder to look very shiny. Once the stain was dry I took another paintbrush and painted on 1 coat of varnish. The varnish is a final coat that leaves the piece looking sealed and shiny. Once the varnish is completely dry you can now place the candleholder anywhere you’d like. I placed mine on top of my table and used it as a centerpiece. I also place it on top of the fireplace mantel.

EXTRA: I eventually carved my boyfriend’s, and my initials into the piece of wood. I did this with a stencil and a electric wood carver. This is very easy to do and adds more to the piece.

Hope you guys enjoyed the DIY wood candleholder centerpiece tutorial!   

Saturday, 6 October 2012

DIY Striped Stained Table


Striped Stained Table
 
This week I decided to redo an old side/coffee table that I found at my boyfriends house. This project was defiantly the longest and hardest to do so far, but of course it’s the best one I’ve ever done!

These are the things you’re going to need to do the Stripped Stained Table.
  • An old or new side/coffee table
  • Sander
  • Varnish (water based)
  • Wood stain (chestnut)
  • Aqua Sea acrylic paint
  • Paint Brush
  • White acrylic paint
  • Tape
  • Pencil
  • Ruler

 Step 1: After you have chose a table you would like to redo you can now plug in your sander and sand every edge of the table making sure that all surfers are no longer shiny or have any type of varnish or finish left on it.

Step 2: Once the table is completely sanded you can now start painting the legs and if theres a little shelf under the table like mine you can paint that a solid color too. I chose to go with a greeny blue. This paint color is called Aqua Sea and it’s an acrylic paint that can be purchased at any craft store. Do at least two coats of paint until everything inch is completely covered.

Step 3: Once the table legs have dried you can now use your wood stain, which can be purchased at home hardware. I chose chestnut because I wanted my table to look darker. Take a paintbrush and stain the top of the table and the edges. Only do one coat.

Step 4: After the stain has dried take a paintbrush and do one coat of varnish to the top and edges of the table. The reason why you should varnish is that if you get paint on the stain it will wipe off easily and will give the table a shiny look.

Step 5: Once the varnish has dried you can now take out your ruler and measure how many stripes you like to put on the top of the table. Even out the stripes out so that each side is either stripes or no stripes, this is where I messed up.

Step 6: Once you have measured your stripes out evenly, take a pencil and a ruler and draw on the stripes. After the stripes have been drawn on you can use any type of tape and just place the tape of one side of each strip .The tape is to help you see the lines and it prevents you from putting paint onto the varnish side.


Step 7: Mix the white paint with the varnish so that it thins the white out and gives it a glosser look. Use the paintbrush to do big brush strokes so that the white doesn’t completely cover up the stain underneath.

Step 8: Once the top of the table is dry, take the tapelines off of the table. Use the varnish to go over every inch of the entire table just to seal all the paint and stain in and to give it a shiny look. Once the varnish has dried you are completely done and now can start using your table! Hope you enjoyed this project!

Extra: Step 9: This step is only if you messed up your lines or wanted to add a quote to your table. Unfortunately, I messed my lines up and decided to paint on a quote just to make the table look better. The quote I chose is “oh darling, lets be adventures’. How I painted this quote on was that I printed out the quote on Microsoft word, and then I taped the quote where I wanted it to be on my table. I then used tracing paper that can be bought at any craft store, and put the tracing paper under the quote and used a pencil to trace the quote on. Once the quote was put on I used a thin paintbrush and white paint to paint on the quote. I did three coats of paint until the quote looked bold. 


Tuesday, 2 October 2012

DIY Knife Block Redo


DIY Knife Block Redo

So I decided to repaint my knife block to give it a bright new look! This was really easy to do and looks great in the kitchen.

For this craft you’re going to need the following:
  • Knife Block
  • Sander
  •  Paint
  • Paint Brush
  •  Pencil
  • Tracing Paper
 Step 1: First you’re going to sand your knife block right down until the glossy finish has come right off. The reason being is that the paint will not stick onto the block and will chip really easily. If your knife block doesn’t have a glossy finish then there’s no reason to sand.

Step 2: After sanding, choose a paint color that will go best in your kitchen, I chose red. Make sure the paint is an acrylic paint; these can be purchased at any craft store. Use the paintbrush to do three to four coats until the knife block looks totally covered.

Step 3: Now this step is for adding, “knives” or any other quote that you would like to add to your knife block. To do the quote you must use tracing paper that can be purchased at any craft store, a print off of “Knives”, tape and a pencil. Place the print off where you would like it to go on the knife block then tape it on, slide the tracing paper underneath, then use the pencil to trace on the quote.

Step 4: After the quote has been traced on, use a darker color to fill it in. I choose black and I used a skinny paintbrush. Use the paintbrush to paint in between the lines. I added brush strokes on the top of the knife block just to add some detail. After the paint has fully dried you can now place your knives back into the block and begin to use it daily!